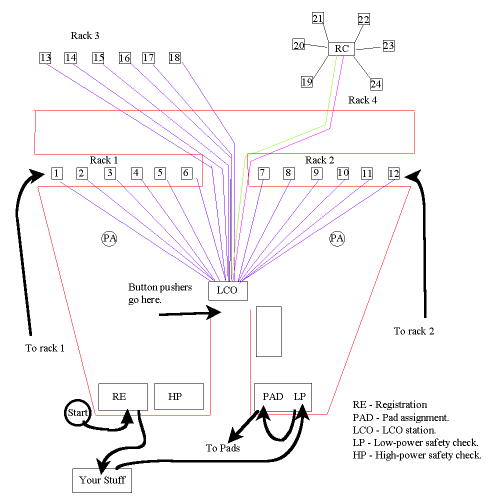
LUNAR Low-power Field Procedures


Return to contents    Previous Section    Next Section


Setup   Register   Prepare   Flight Card   Inspection   Pad Assignment   Load   Launch   Recover

LUNAR provides all the ground equipment for a launch. You need to bring all your own consumables (engines, ignitors, wadding, glue for repairs, food, drinks, sunblock, film, etc.), hobby tools and the rockets. There are drinking fountains and bathrooms at the field. When you first arrive, stake out your setup area. There are a few picnic tables around the park, but they are usually claimed early. You may need to bring your own work surface and chairs, or arrive early to claim part of a table. Otherwise, be prepared to work off the grass.


Return to contents.

Help Setup The Pads

LUNAR is not a service, it is a member participation organization. For that, you need to help out and setting up is probably the biggest job out there. The launch starts at 9:00 a.m. so try to arrive by about 8:00 a.m. to help set-up. If you arrive later and the pads are not yet set-up, walk on over and ask what you can do. Note that you get paid in flight cards for helping to setup.

More information on setting up, tearing down and helping out during the launch is in the Helping Out section.


Return to contents.

Launching With LUNAR


After things are set-up and you have staked out a spot, follow the arrows in this diagram to get registered, flight cards, safety check and launch.


Return to contents.

Register And Buy Flight Cards

As soon as you get settled, the fliers in your group need to sign up at the registration table. If you want to fly and are not a current member (our membership period follows the calendar year) you need to either join the club, renew your old membership, or pay a walk-on fee.

You will need a flight card for every flight you intend to make. If you need more flight cards, now is a good time to buy them. There are two kinds of flight cards depending on what kind of engines you are using. Regular flight cards are for model rockets (A through E engines) and high-power flight cards are for high-power rockets (F through H engines). The flight card fees go to refurbishing the existing launch pads and building new ones. The LUNAR fee schedule for launching and dues is as follows:


Return to contents.

Prepare Your Model Rocket

The next step is to prepare your rocket for flight. Have it completely ready to go, with the engine and igniter in place, and the recovery system prepped and ready. If you need help, Club members are almost always available to answer any questions you may have about how to do this properly and to lend a hand for emergency repairs or missing parts.

Install An Appropriate Engine

Most model rockets built from kits specify which engines are most appropriate for use in the model. The engines are specified both in terms of engine power and delay time. See the Engines section for more information. In general, use a small engine for the first flight to see how things hold together, you can use larger ones later. Use smaller engines if it is windy so that your rocket comes down somewhere close by. People who launch a two-stage rocket with the biggest engines they have on a windy morning tend to see their rocket floating out into the vineyards, never to be seen again (there's a lot of them out there somewhere.)

Choose an appropriate time delay. Most kits list time delays for each class of engine that allow the rocket to reach its highest point before activating the recovery system. If you use a longer delay, your rocket will arc over and be well on its way to the ground before activating the recovery system. While this might sound kind of cool, you will probably change your mind when the parachute opens at too high a speed and shreds, then the shock cord zippers open the whole side of your rocket, and finally it hits the ground and smashes anything that has not already been shredded or torn. You should add no more than about 2 seconds to the longest delay recommended for your rocket.

Insert the engine and secure it according to the instructions for your rocket. Some rockets have a retaining ring or clip while in others the engine must be must be taped in. Some rockets , such as the Estes Mosquito, are designed to eject the engine at apogee so their engine is installed just tight enough to keep it from falling out during launch but not so tight that it sticks when the ejection charge fires.

Prepare The Recovery System

The next step is to prepare the recovery system. For most smaller rockets, this involves placing two or three loose wads of recovery wadding in the body tube of the rocket. We have found that three loose balls of wadding about the diameter of the body tube works best. The recovery wadding works like a plunger above the engine that pushes the parachute or streamer out the top of the rocket when the ejection charge fires. The recovery wadding also protects the plastic parachutes from being welded into a solid glob by the hot gases of the ejection charge.

Carefully fold the parachute or streamer. Grab the parachute at its top and at the knot where all the shroud lines come together. Stretch everything out straight and fold the parachute between where the shroud lines attach to make a triangular shape.


First stretch out the parachute and the shroud lines.

Fold the parachute into thirds, being careful to not tangle the shroud lines. Lightly wrap the shroud lines around the parachute to keep them from getting tangled.


Fold the parachute in thirds then lightly wrap the lines around it.

Place the parachute or streamer in the rocket's body tube along with the shock cord and install the nose cone.

Installing The Igniter

Install an igniter in your rocket. Estes type wire igniters are inserted into the bottom of the engine and held in place using a plastic plug. If you do not have a plug, take a small ball of recovery wadding and place it in the engine nozzle. Do not pack it into the nozzle, but just place it in the open end so that it holds the igniter in place. Place a strip of scotch tape over the end of the engine to hold the wadding in place.

After the igniter is in place, bend the two wires into rabbit ear shapes to make them easier to grab onto with the alligator clips on the launcher.

When installing Copperhead igniters, follow the manufacturers instructions. Copperhead igniters have to be installed all the way down to the bottom of the fuel grain. When you insert them, you usually have to feel around inside the nozzle to find the hole in the fuel pellet. Continue sliding the igniter down the hole to the bottom (usually a couple of inches). Use a plastic cap, rubber band or piece of tape to secure the igniter to the bottom of the engine so it cannot slip down and out.


Return to contents.

Fill Out The Flight Card

If you are flying F or larger engines please follow the high-power procedures. These following procedures are for low-power (A through E engines) flights.

You must fill out a flight card for each flight of each rocket. These cards tell the Low-Power Safety Check Officer (LP-SCO) what type of engine is in your rocket and what type of recovery method is employed. They also are used in pad assignments and to tell the Launch Control Officer (LCO) whose name to announce when it's time to fire a particular pad. It's a good idea to bring a pen or pencil to use in filling these out. After the flight, you do not get the flight card back to reuse; it becomes part of our archives.

Fill in the fields as follows.

  • Rocket Name - This is the manufacturer's name for a rocket kit or whatever you have named it for a scratch built..
  • Manufacturer - The name of the kit manufacturer.
  • I want to push the button - Check here if you want to push the button otherwise the LCO will do it.
  • Owner/Builder - Who owns/built the rocket.
  • Motor(s) by stage - Put the letter-number code for the engines you are using in each stage of the rocket.
  • Recovery Method - The method for safely recovering the rocket (parachute, streamer, tumble).
  • Comments/Features - List any special features, such as first launch, has gliders and so forth, whatever special item the LCO and the spectators should watch out for. For rockets with known questionable flight profiles, mark here as a heads-up launch.


Filling out a launch card.


Return to contents.

Get Your Model Rocket Inspected

After your rocket is prepped and your flight card is filled out, take both to the Low-power Safety Check table and have the rocket inspected for safety. Loose or excessively crooked fins or launch lugs, and improperly installed engines or recovery systems are a few of the things that will cause a rocket to be rejected for flight. We will also reject engines that are not NAR or Tripoli certified. If your rocket checks out O.K., the LP-SCO initials your launch card. If not, he shows you what the problem is and asks you to fix it. He may even help you fix the problem if he has time or may point out one of the other club members who can help you out.

Get a Pad Assignment

Next, get into the pad assignment line. When a pad is available, the Pad Assignment Director (PAD) will assign your rocket to a pad. If things are not busy, the LP-SCO may assign you to a pad as soon as he finishes the safety check.

We have four groups or racks of pads:

  • Rack 1: pads 1-through-6, Low-Power
  • Rack 2: pads 7-through-12 Low-Power
  • Rack 3: pads 13 through 18 Low- or High-Power
  • Rack 4: pads 19 through 24 High-Power
They are arranged so that we can be loading one rack while launching from another. When the Pad Assignment Director has assigned you to a pad, you must wait until the LCO declares the rack open and available for you to install your rocket on a pad. Do not go near any of the pads in a rack when the rack is closed.

We have found it useful to write the pad number you have just been assigned on the back of your hand. This makes it much more difficult to forget which pad you have been assigned to. It is also useful when you have a large group of children, all launching on different pads.


Return to contents.

Put Your Model Rocket On The Pad

When the pads open up for installing rockets, carry your rocket to its assigned pad and install it. We support many different size rockets and types of igniters, so it may be necessary to change the launch rod or igniter clips on a pad before the rocket can be installed. If the igniter clips have a spent igniter in them (from the previous flight from the pad) please put it in the trash receptacles provided next to the pads. The spent igniters are especially hazardous to the bare feet of other people who use this park. Try to keep the ground clean around the pads.

Emphasize eye safety around the ends of the launch rods!

Changing Launch Rods

The launch rod is held in the stand by a thumbscrew located under the blast deflector and opposite the handle used to tilt and rotate the stand. This thumbscrew must be loosened before the launch rod can be removed. Failure to do so may result in a bent launch rod. After the rod is replaced in the stand, the thumbscrew must be tightened again to hold the rod in place. Failure to do so may result in your rocket trying to carry the launch rod along on its flight (we have seen this happen). A gentle tug on the rod after the thumbscrew has been tightened will confirm if you have properly secured the rod. Remove the launch rod standoff from the the old rod (loosen its thumbscrew to do so) and place it on the new rod.

When changing the launch rods make sure the blast deflector is in place before installing the new rod.

Place the old launch rod in the tube provided for idle launch rods. Do not leave it lying on the ground, there it may either be lost or get stepped on and bent.


The launch stand with the blast deflector plate, launch rod and launch-rod standoff.

Please use the proper size of launch rod for the size of the launch lugs on your rocket. If the rod is too small for the lugs, then your rocket is not getting the initial guidance it requires and it may take off in an unpredictable direction. If the rod is too big for the lugs, then the rocket may bind on the rod and not fly at all. When installing the rocket on the launch rod never bend the rod down to meet the rocket. Instead, tip the pad head over (using the handle) until you can reach the end of the rod without bending the rod.

Using The Standoff

The launch rod standoff serves two purposes. The first is to hold your rocket up off the blast deflector where the igniter wires could short. The second is to prevent the suction generated when the rocket blast hits the blast deflector from holding your rocket down and preventing it from launching. Not only does this back blast prevent your rocket from launching, it does bad things to the bottom of your rocket. Attach the standoff to the launch rod about 4 inches above the blast deflector. It should be oriented such that none of its parts are directly in the path of the motor's exhaust and that no parts of the rocket (such as a motor clip) can hang up on it. Also be sure that the igniter clips don't touch it and short out.

Changing Igniter Clips

There are three different styles of igniter clips in use in the club, the common two-clip configuration most often used on single Estes igniters, a special three-clip configuration used with some clustered motors and the Aerotech clip used with Copperhead igniters. Select and use the type of clip that is appropriate for your igniter configuration. To change the igniter clips, simply unplug them from the end of the extension cord. Try to not use the special three-clip cluster configuration for other than two- or three- engine clusters.


Special three-clip configuration used with clustered motors.

There are several ways the common two-clip configuration may be used with the Aerotech Copperhead igniters if you prefer. If you don't know how to do this, ask at a launch or a club meeting and someone will be glad to show you. If you change out a set of igniter clips, remember to place the unused ones back in the milk crate by the idle launch rods. Do not leave unused clips lying on the ground next to the pad.

The alligator clips often look pretty dirty but in spite of the dirty appearance, they do a good job of supplying power to the igniter. Most ignition failures can be traced to other causes such as shorted clips or igniter wires, broken igniters or igniters not in contact with the propellant grain of the motor. If you still believe you need to clean the clips, do so gently using the fine wire brushes in the milk crate by the launch rods.

Cleaning the Aerotech clip requires a special technique. You must fold a sheet of 600-grit sandpaper in half (grit side out) and insert the folded sandpaper into the clip as you would a Copperhead igniter. With the clip closed on the sandpaper, draw the sheet out of the clip to the side. Doing this just once will clean the clip. Doing this more than once will unnecessarily wear the clip. Under no circumstances, while using, inspecting or cleaning the clip should you attempt to "spread open" the clip. To do so will cause the clip's hinge to break. These clips are made to only be squeezed and if you do otherwise, they are going to break.

You will usually find a spent igniter in the clips when you arrive at the pad to load your rocket. Remove the spent igniter and place it in the trash can located at the pad for this purpose. Also pick up any other trash you may find on the ground around the pad such as igniter plugs, wadding, motor caps, etc., and put that in the trash can too (igniter plugs and wadding can be reused). We need to keep the field clean to be allowed to continue to use it.

Attaching The Igniter Clips

When installing any of the clips on the motor igniters try to position the clips and wires out of the line of the motor's exhaust.

Setting Direction And Attitude

When your rocket is on the pad and ready to go, you can set the attitude and direction of the pad. If there is a little wind, angling the rocket into the wind a small amount will make the rocket land closer to the launch pad. To adjust the rocket's attitude on the small pads (pads 1 to 12) grab the metal pipe that extends horizontally out from under the blast deflector. Use this pipe to rotate the pad and to tilt it. Do not tilt any rocket more than 30 degrees from vertical. On the larger pads, loosen the large knob on the side of the Panavice and tilt or rotate the launch rod. Tighten the knob when you are done.


Return to contents.

Launch Your Model Rocket

When it is time for your rocket to be fired, your name and a description of your rocket are announced over the PA system. You may go to the launch controller to launch it yourself, or you may let the LCO do it for you. If there is a problem and your rocket won't launch, the LCO may let you make a quick check of your connections and igniter to see if you can get it off. If there are a lot of people in line to launch, you will be asked to remove your rocket from the pad so the next group can setup and launch. If you must remove your rocket from the pad, be sure to get your Flight Card back from the Pad Assignment Director. You may then fix the problem, get a new pad assignment, and try again. If you are having problems, ask any of the club members and they will be glad to help you.


Return to contents.

Recover Your Model Rocket

After your rocket flies and the recovery system activates, you may go recover your rocket. If your rocket lands in the cordoned-off safety zone, you must wait until the LCO gives permission to cross the yellow string barrier and retrieve it. When you are chasing your rocket as it drifts down (you shouldn't be chasing other people's rockets), please be careful about watching where you are going, to avoid tripping or running into things. Be especially careful when crossing the street that runs through the park.

If you happen to find someone else's rocket while searching for your own bring it back to the Lost and Found box at the Registration Manager's table. Many lost rockets eventually make it to the Lost and Found so check there often if you are missing one. Never try to catch someone else's rocket before it hits the ground. The odds are that you will miss it and end up walking on the rocket which does a lot more damage than hitting the ground will. This is not speculation, we have seen it happen many times. If you have children with you, make sure they understand this rule.

While at the launch site, pay attention to the announcements made over the P.A. system, and if the LCO calls a "HEADS UP" or sounds the alarm you must stop what you're doing, identify the hazard, and do whatever is necessary to protect yourself and others from it. Not every recovery system works as planned.


Return to contents    Previous Section    Next Section
| About LUNAR | Home | Calendar | Contacts | Gallery | Old Gallery | Member Pages | Events | Presentations & Docs | LUNAR'clips | Handbook | Space Place | Mailing Lists | Joining | Other Rocketry Pages | Site Map | Frames |

All content is the responsibility of LUNAR. If you have comments or suggestions regarding these web pages, please contact the

Copyright © 1992 - 2024 LUNAR


Last modified on Tuesday, 31-Mar-2009 17:00:00 PDT