Ooops wasn’t the first word that I actually used.
The story of how I got to this point is long and boring. But at the end of that story, I had a nice, all carbon fiber 54mm minimum diameter screamer I was affectionately calling Doppler Shift. I launched it on a J415W at December’s Snow Ranch launch and promptly lost it, despite having a Walston RF tracker onboard.
I was hacked to say the least, but I managed to recruit our club president to go back to Snow Ranch with me on Sunday and hike the acres with the receiver looking for it. As luck would have it he found it, but it managed to find the one rock on that hill and broke a fin.
This is a minimum diameter rocket. The fins are surface mounted, and since it was originally designed to fly on an EX “L” motor, they had to be strongly attached. The original work was done by James Marino, and he used both fiberglass and carbon fiber to attach the fins. Only one fin was damaged, and it was not actually broken, but the fin to airframe attachment was broken. The layups where still intact, and were still holding. So I wondered “What should I do?” This article is about what I did, and how it worked out.
Since only one fin was affected, and also because the work had been done using multiple layers of cloth that ended with a full tip-to-tip layer of CF, I really didn’t want to have to cut all three fins off and start over. So I made the decision to just remove the one fin, and not to do a full tip-to-tip layup over the other fins.
Getting the fin off proved to be a small challenge. Donning my mask and grabbing tools, I put a #60 pad on the palm sander and started grinding. I was able to cut through the glass and CF on the broken side first, and then weaken the other side enough that I could fold the fin over. At that point I used a chisel (not one of my good ones!!) and basically carved the fin loose. It was not too bad, and I could see the small dado groove where the fin was supposed to be attached.
The sander was further employed to grind down the fillets that were made from epoxy and carbon fiber strands (milled CF). They were quite hard, but the 60 grit did most of the work. I did have to use the chisel again to clean out that groove, but that wasn’t too hard.
The fin was made of G10. I had to get all the old stuff off, so I attacked it with the sander and after a few minutes, it was almost like new. I cleaned up the airframe, removing all the layers of carbon, filler, primer and paint to get down to the original airframe tube. It was time to reattach that fin.
For many of you, this is a standard practice, but some of you may not know this trick. Since the fin had to be really solidly attached, I wanted to use a good 30 minute epoxy. I like using NHP epoxy which is American made. But the thing is, it takes a long time to set up and cure, and that means using tape, and fussing with it, and that’s all bad. So to make it work, I also use slow cure (thick) CA and Zap kicker. I put the epoxy on the root edge of the fin except for the last 3/8″ or so at each end, where I then apply the thick CA. I put the fin into the groove (and this is a very shallow grove, maybe 0.015″ to 0.020″ deep), and position it. Then I take a can (I have the spray can but they also sell it in a pump spritz bottle) of Zap CA kicker and spray the two ends. Viola! The fin is locked in place and I don’t need to use a bunch of tape and wait around for that 30 minute stuff to set up. I used some of the left over 30 minute epoxy to create simple fillets using a Popsicle stick to set the radius.
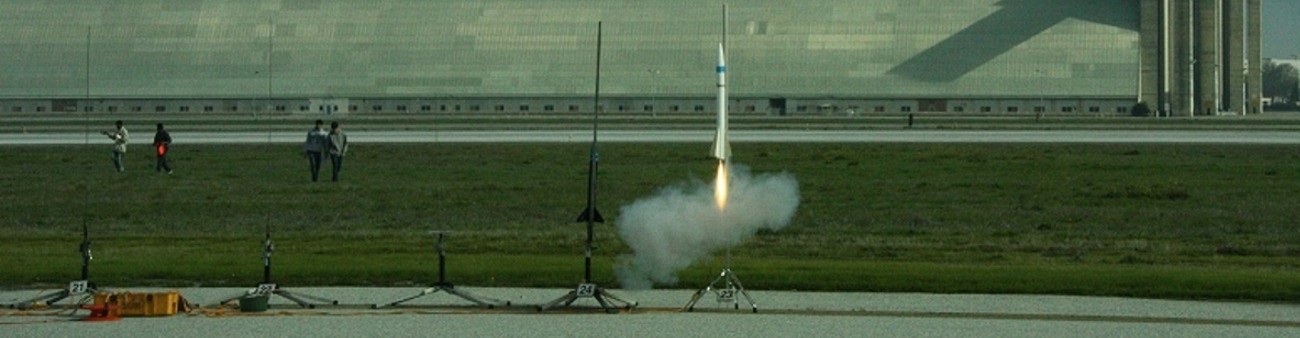
So now I could focus on doing the layup. As I mentioned, I didn’t want to do a tip to tip layup across the airframe because I didn’t want to have to sand down the layers on the two other good fins. So I cut two small pieces that were a little longer than the fin root and wide enough to span from about half way up the fin to a little less than half way around the airframe between the fins. See figure 1:
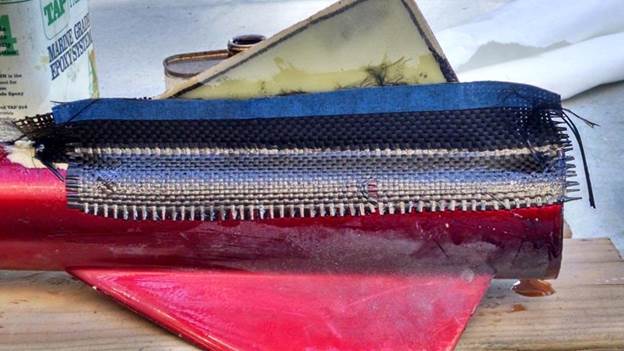
Figure 1: The first layers
Note the blue tape. For those of you not familiar with working with CF, it unravels very easily. If you put strips of blue tape on the fabric and then cut down the middle of the tape, you will avoid many, many frustrations and loss of material. The really cool thing is that epoxy will melt the tape’s glue and it will simply peel right off. In the photo above, three sides of the tape have been removed already.
You will also notice that the CF is over the old paint. That’s no problem, because I cut it back to the sanded portion once the epoxy went green. It’s just way easier to work with bigger pieces than to cut to the exact size and have to worry about locations and orientations. You can see the finished product in figure 2.
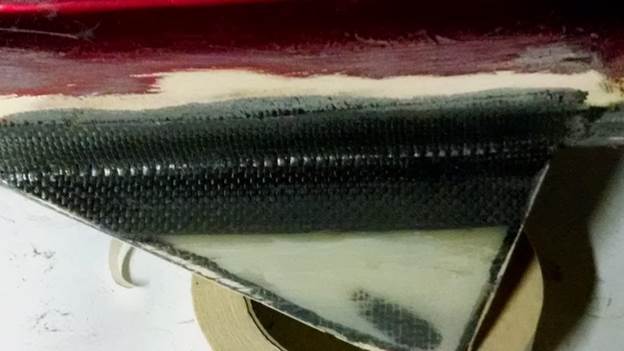
Figure 2: First layer trimmed
My plan was to let the epoxy go green and then do the second layup, but life got in the way, and I had to wait until the next day. I was therefore able to sand the first layers down and shape and feather them in. It looks pretty rough, but that’s fine, there will be a second layer.
The next day, I was able to go for the full sized pieces. These would span the whole fin width, and extend over the first piece on the airframe. I need to blend all this new CF in with the old, and it will be painful, so having a single layer to blend in will be much easier to deal with.
When I did the second layup, I just wet-out the fabric and put it on. I did both sides at the same time, and made sure I got good wetting and good adhesion over the whole area, fusing the two layers well beyond the fin edges. (See the figure 3.)
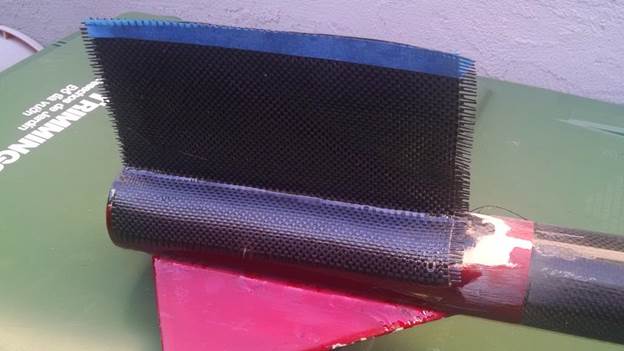
Figure 3: Layer 2 Untrimmed
Once again, I used pieces that were well oversized so that I had plenty of material to trim off and feather in. When the epoxy had set up to just past the green stage, where things were no longer tacky, but the layup was still a little bit flexible, I trimmed off the excess. See figure 4.
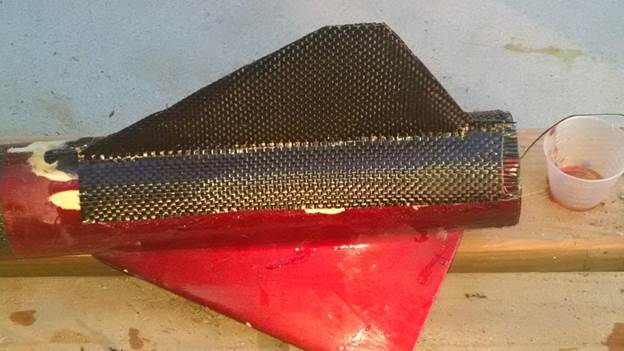
Figure 4: Layer 2 trimmed
As you can see from the photo, the fin is nicely attached, and even though at this point it’s not fully cured, it’s rock solid. Maybe not ready yet for that EX “L” motor, but I bet I could fly it on a J and it would survive perfectly. Hopefully by the next Snow Ranch launch, it will be ready to go.
I did this work over the weekend of January 24-25. The weather was unseasonably warm (in the 70’s!) in south San Jose, and I figured I could do good layup work. Still, it was cooler on my patio, never more than 70 and only that warm for a little while. So for the layup, I used a fast hardener. I like to use a good marine epoxy for doing my layups, but I’m not a rich guy, so I used TAP brand marine epoxy with their fast hardener. I get a decent pot life, but I know it will kick and set, even if the air temp is less than 70 degrees.
Now the real work begins. I need to sand and fill the weave, feathering it into the existing fin can, and getting it ready for primer and paint. To fill the weave, I used Bondo brand spot glazing putty. It’s a lot like Squadron putty, but comes in a much bigger tube and is a lot cheaper. When applied in thin layers it cures very quickly, and sands like chalk. But it’s a polyester based product, so I had to wait until the epoxy was well cured before I started applying it. Also, because it is a polyester based product, it really doesn’t adhere as well as if it were made from epoxy. But because it’s polyester, it’s far easier to sand and shape. Everything in rocketry is a tradeoff, depending upon how you want to proceed. I’m a lazy guy, and I don’t want to sand epoxy. It’s hard, and it’s unforgiving. Plus, it’s heavy. Glazing putty is light, and since this is not for strength but for cosmetic and aerodynamic purposes, it’s perfect for me.
On Monday, although the air temp was much cooler, I was at it again, this time sanding with a palm sander and then with a rubber sanding block. I started with the #60 paper on the palm sander, but switched to #100 on the hand sanding block. My goal was to remove the extra carbon, and start the feathering of it all. The work proceeded nicely, and in less than 40 minutes, I was ready to apply my first coat of glazing putty. See figure 5 for the details.
It’s important to mention that when sanding composites that you wear a good, high quality dust mask and gloves. Both fiberglass and carbon fiber will wreck your lungs more than you will immediately know, so don’t skimp, and don’t cheat. You (normally) only get one set of lungs, so protect them. This applies whether you’re using a power sander or hand sanding. Both generate fine particulates, and those particulates are terror for your lungs and skin. I managed to get a carbon sliver in the webbing of my fingers, even wearing gloves. It took some fine pointed tweezers to get it out.
Once I had the rough sanding done, it was time to put on a coat of glazing putty. I once read on Dave Triano’s website (http://www.shadowaero.com/) that you should never sand down, just build up. He was talking about composites, of course, and it is sage advice. Sanding down into the weave only weakens it. Build up provides material that can then be removed without cutting into your composite structure, and will maintain the integrity of your layups. I like to use glazing putty because it goes on easily, dries quickly, and sands like chalk. The only thing is, you can’t apply it too thickly, or it won’t harden, and will make a huge mess when you try to sand it. I apply it with a spatula, eith plastic or a metal blade, but I also use my fingers. The stuff does eat through Nitrile gloves, however, so be aware that you’ll need to double glove or maybe use vinyl gloves instead.
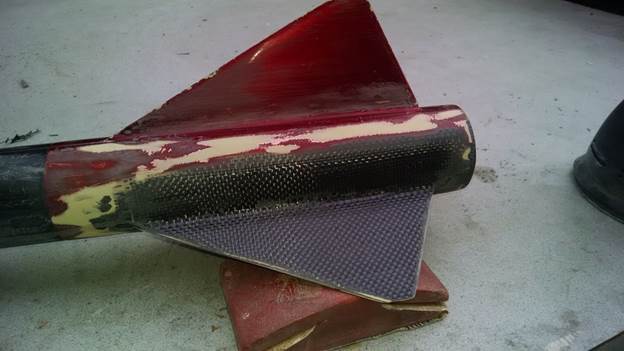
Figure 5: ready for sealing
Figure 6 shows my initial coat. It doesn’t have to be pretty; it just has to be on there. Most of it will be sanded off, and there will be several more coats applied and sanded off.
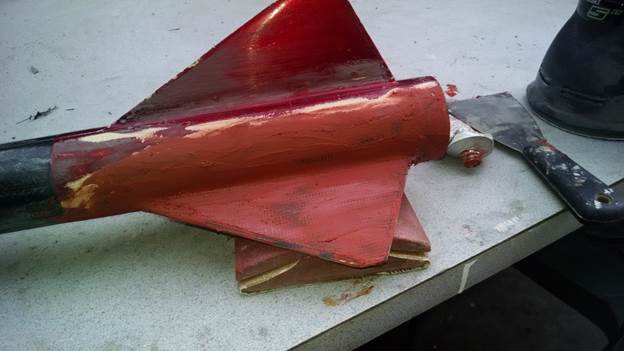
Figure 6: First coat of glazing putty
I let this “dry” for an hour or so, and then checked on it.
Once I’d done several more layers, and smoothed them all out with some #320 sandpaper it looked like it was ready for primer. Any small imperfections can be fixed using Squadron putty. It dries even faster than glazing putty, and is perfect for fixing small pin holes, divots, etc.
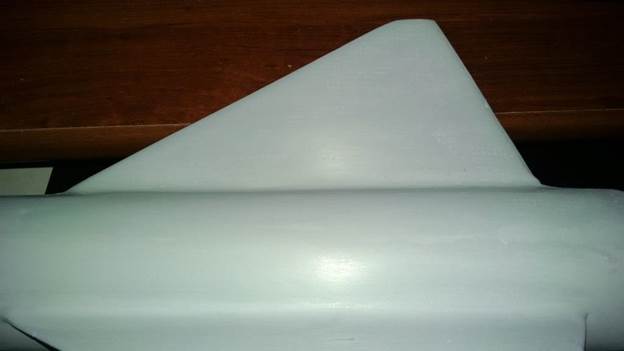
Figure 7: Primed and sanded
In figure 7, it still needs some work. The weave is still visible, and there are small scratches and pin holes, but for the most part it’s coming along nicely. I need to do the fine detail work (paint is very unforgiving; any imperfections are usually amplified by the paint), and do another coat of primer.
I like to use a super high build polyester primer that I get from House of Kolor, but I’m out of it, and the last two times I ordered it, UPS smashed the box and it leaked all over the place. I’m certain it made a huge mess in their truck, and since I like my UPS guy, I haven’t ordered any in recent times. It used a catalyst (MEKP or similar) and it cured very quickly. You needed to clear your gun immediately after shooting it or you were buying a new gun, but since I’m a cheap guy and buy mine at Harbor Freight, it wasn’t all bad if I forgot or didn’t do a really good job of cleaning it out. So I’m using Rustoleum automotive primer. It smells really bad, but it wet sands nicely and cures out pretty quickly. In figure 7, there are three coats of primer, which I wet sanded using 320 grit. The final coat will likely be wet sanded with 600 grit sand paper.
It was now Saturday, January 31, 2015. The weather is once again cooperative for painting. So, dug out my paint box and found what I needed. I have no intention of repainting the whole rocket; I only want to paint the bottom end. You know how the Rocket Gods love to take repainted rockets! But I did need to sand the old clear coat to remove the sheen. I used 320 dry, and then 600 wet to get it ready. I masked off the fins again, and mixed up some silver flake base coat. Since this rocket was originally painted with candy colors, they require some sort of base color or they won’t work well. I like the metallic look, so I used House of Kolor’s Orion Silver. It’s a small flake size so it won’t look like a bass boat once finished, but it will still be a nice metallic reflection under the candy.
HOK paint is urethane based automotive paint, typically used on custom cars. You need protection, and you really should paint in a booth. I don’t have a booth, so I painted in the free air along the side of my house. It was slightly windy, so I had my neighbor move their killer black BMW out of their driveway while I was spraying.
I forgot to take a picture of the base coat, but I applied two coats for coverage. The first was a standard coat to cover the primer, and the second coat was a wet coat to float the metal flake and make it even. This is probably the hardest part of the whole thing, and I’m not really that good at it, but it came out OK.
The un-catalyzed base coat dries very quickly. They recommend 10 minutes between coats. I used a medium reducer, but the temp was at least 70, so it worked out very well.
For the candy color coat, I used the original Fire Orange from the Kustom Shop at TCPGlobal (www.tcpglobal.com). They use HOK paints, but have a wide assortment of custom colors you can buy outright so you don’t have to mess around with mixing your own and keeping track of what and how much you use to make a color.
I shot 3 coats. The first two were light coats that were put on a little dry. I used a fast reducer (typically for use under 70 degrees) so that it would dry faster. The reason is that for the final coat, I put down a very wet coat, and I did not want it to run.
Figure 8 shows the fins after two coats.
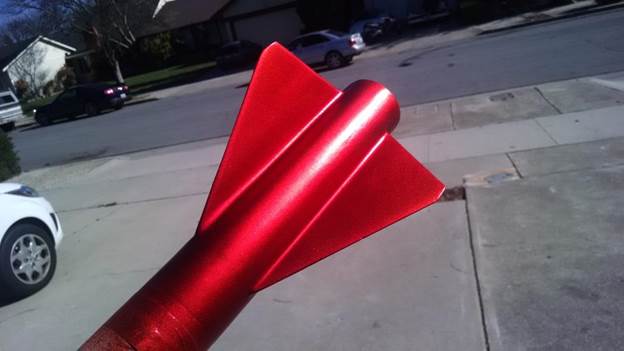
Figure 8: Two color coats.
I let it cure for about a half hour or so, mostly because I had to look up the mix ratio for the clear coat. I’m using HOK UC35 Kosmic Klear (they have a real penchant for using the letter “K”), which is a fabulous clear coat. It cures out as hard as a billiard ball (ok, maybe not quite that hard, but it’s really quite hard once fully cured) and looks wet like it was just applied.
I did two coats. I mixed 2 oz. of clear with the required 2:1:1 mix ratio, and shot about 2/3 of that on the first coat. It was about 3 full passes on the airframe, tip to tip including the fins, but I had the flow restricted so it wasn’t a super wet coat.
I let that sit for about 10 minutes while I mixed another 2 oz. of clear mix, and then set the gun for a much higher flow rate. This gave me a nice, wet, and completely shiny final coat. I did not end up using all of it. I had maybe 1 oz. left over, but it worked out to be maybe two complete trips around the airframe with some extra attention on the fins.
Figure 9 shows what it looked like in the sun.
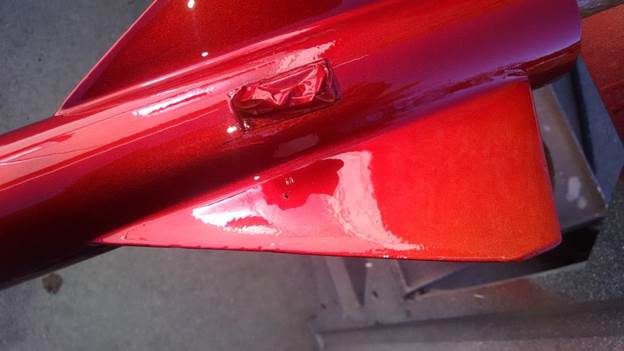
Figure 9: The wet look
As you can see, there are some issues with painting outside vs. painting in a booth. That little black spot is a gnat. Also, you can see where I did not bother to fix the rail damage. This shot is not of the repaired fin. In fact, it is of the two other fins. But you can clearly see just how shiny this clear coat really is. In this photo, it’s not completely cured, and it really won’t be for at least 24 hours. But it’s already not tacky, and it still looks like I just finished spraying it!
Figure 10 shows the repaired fin (at the top, pointed up) after about an hour sitting in the sun in my driveway. It also shows a good part of the repainted airframe (fresh clear coat) and you can really see that carbon weave has just “popped”.
Repairing this fin was a really great bit of rocket building. While I didn’t take nearly as much time as I might have on an initial build, it was still the full experience of doing a layup (without vacuum bagging) and doing the (typical for me) finishing work.
This rocket is ready for that K1275R, and pretty much anything I can put in it!
Figure 10: The repaired fin