The LUNAR model rocketry club is not a service for rocketeers, it is an all-volunteer organization where everyone is expected to help out. Setting up, tearing down, and taking a turn in one of the following positions is a LUNAR membership requirement.
- Range Safety Officer (RSO)
- Launch Control Officer (LCO)
- Low-power Safety Check Officer (LP-SCO)
- High-power Safety Check Officer (HP-SCO)
- Pad Assignment Director (PAD)
- Registration Manager (RM)
- Launch Pad Supervisors (LPS)
- FOTH
They are also a lot of fun to do. If you like pushing the button, try LCO for an hour. You get to launch about 50 rockets and you don't have to chase after any of them. Do you like checking out people's new models? The Safety Check Officer gets to do a hands on check of every rocket that flies. Kids like Pad Assignment Director because they get to tell adults what to do.
None of these jobs are very difficult, many can be done by our younger members, and when we all do our fair share they are not a burden. Sign up for jobs on the white board in front of the Safety Check area.
Table of contents
Setting Up For A Launch
People wanting to help with setup should try to arrive at the field around 8:00 a.m. as we usually try to start flying by 9:00. Go to the trailer where the equipment is being unloaded and say "I want to help", we'll put you to work.
The setup for a launch looks like the following.
Step one is to start unloading the trailer, especially the center section as it needs to be cleared out to get to the rest of the equipment.
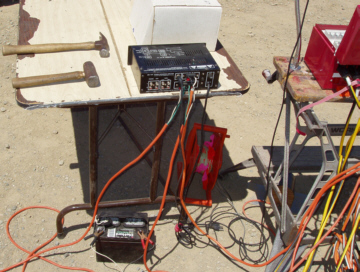
The second step is to set up the tables. Setup the Launch Controller table (the small table) first as all of the others are setup relative to it. Haul the boxes with the spools of wire out next to the tables. The launch controller goes on top of the Launch Controller table.
LCO Table showing the wire spools in front of it
'The LCO table.'
Each of the racks has a remote launch controller box to go with it. Each is marked with the pad numbers so be sure to get the right one. All of the setup equipment for the two racks of low-power pads is in two large boxes. Pull the two boxes about 30 feet out in front of the Launch Controller. Inside each is the remote launch controller box for that rack.
The Contest/Tarc rack (rack 3, pads 13 to 18) goes to the left of rack 1 about 75 feet from the launch controller. The mid-power rack (rack 4, pads 19 to 24) goes about 100 feet straight out from the launch controller. The two high-power racks (racks 5 and 6, pads 25 to 36) go 200 feet straight out from the launch controller, between the creek and the hill. The Away pad goes 500 feet out to the right of the launch controller, across the creek.
Each rack has a roll of wire marked for it. Set the wire spool in front of the launch controller and pull the wire out to the remote launch controller for that rack. Try to keep the wires bunched together as much as possible so people are less likely to trip over them. Plug the end of the cable into the side of the remote launch controller. Unplug a battery from the battery charger in the trailer, haul it out tot he rack and plug it into the remote launch controller. Match the colors when you plug it in. Do not reverse them.
The high power pads take two rolls of wire to get out to them.
The away pad uses the large 500 foot spool of wire.
Setup the pads in a line behind the remote launch controller box. In the remote launch controller box is a wire for each of the pads with a launch clip on the end. The wires are numbered. Make sure the right number is next to the indicated pad.
The low-power pads get a 1/8 launch rod. The 1/8 launch rods are in the short white tube. The mid power pads get either a 1/4 inch launch rod or a rail (the rails with the 3/8 rod on the bottom). These are in the longer white tube and the black tubes. Take a selection to each rack. The high power racks all get launch rails (the rails with the 3/4 ? inch rod on the bottom).
For each pad, there is a pad number that can be poked into the ground next to the pad. There is also a blast deflector and a standoff. Attach these to the pads and insert a launch rod. The mid power pads also have an adapter that fits into the panavice (1/2 inch) and have a 3/8 inch hole for the standard rod adapters.
Place two of the green trash buckets near each rack.
WARNING: don't leave any of the launch rods laying on the ground. Someone will step on them and bend them all out of shape. Stainless steel rods are very difficult to get straight again after they have been bent. Also, you will piss-off the equipment manager and you really don't want to do that. You might get invited to spend a weekend cleaning and straightening launch rods.
Launch Controller
While the pads are being setup, launch controller gets setup. Using a 6 foot wire whip, plug the cable roll for a rack into the launch controller. IMPORTANT: Make sure all of the numbers match. Plug in a foot switch and a big launch button into the controller. Check again that the right numbered roll of wire is connected to the right rack of pads and is attached to the right plug on the launch controller.
The PA System
The PA system consists of a microphone, amplifier and four speakers on tripods. Put one tripod to the right of the launch controller, one 100 feet out towards the high power pads, one 100 feet to the left of the launch controller and one 200 feet to the left of the launch controller. Unroll speaker cable to the right speaker and plug it into the speaker. Place a second roll at that speaker and pull it out to the one half way to the high power pads. go back to the speaker to the right of the launch controller and using a 6 foot wire whip, plug the speaker into the roll of wire. Do the same for the two speakers to the left of the launch controller.
The amplifier goes on the table to the right of the launch controller. The microphone plugs into the back of the amplifier. Wire whips with an RJ45 (ethernet cable) plug on one end and two round pins on the other are for connecting the output of the amplifier to the spools of wire going to the speakers. A power cable with three sets of connectors plugs into the back of the amplifier and into the launch controller. Do not plug it into a battery until everything is setup.
Amplifier and battery setup showing the power, speaker, and microphone cables.
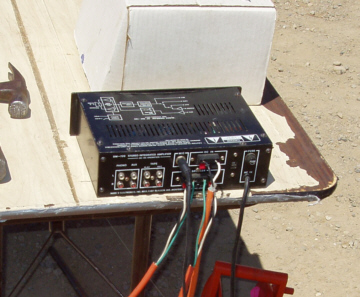
Back of the amplifier showing the power cable attached to the top two connectors and the speaker cables connected to the bottom four connectors. The microphone cable is the black one on the top left. The 110V power cable is not used in this setup.
When the launch controller is setup and ready, and the pa system is setup and ready, plug the power cable into a battery. You may now turn on the pa system and see that it is working.
High- and Low- Power Safety Check
An electronic scale and engine performance chart goes on the high-power safety check table. A small box of repair materials (glue tape, etc.) goes on the low-power safety check table. The white board for job signups goes in front of the safety check tables or on the side of the trailer.
Registration is done on a table under an easyup away from the launch area. The table needs to be setup with the registration box, sign-in sheets, and member roster on clipboards, pens, and cash box.
Barrier
Using the Yellow and Black A-frame barriers and a roll of barrier tape, create a barrier across the front of the launch area so people do not walk behind the HP-SCO and LP-SCO tables or in front of the LCO where all the wires are. Leave a single opening so people can get to the launch controller table.
Tearing Down After A Launch
This starts with picking up all the trash from around the pads and placing it in the trash buckets. Then it's just a matter of consolidating all the hardware carrying it over to the trailer. The pad numbers and blast deflectors go in the blue boxes in their respective slots. The nails and standoffs go in the blue cans. The blue box and can go in the milk crate with the fire extinguisher and the igniter clips are stuffed on top.

A milk crate with the blue box containing the pad numbers and blast deflectors. The blue cans contain the nails and standoffs. The Igniter clips are piled on top.
Unplug the remote launch controllers from the wire reels and the batteries. Fold all the wires that go to the pads and stow them in the remote launch controller boxes.
Wires stowed in the remote launch controllers.
For the two racks of low power pads, The pads, remote launch controllers and the milk crates go into the large black boxes.
Roll up all the wires and place the rolls in the two wire tubs.
Put all the launch rods in the white tubes and the launch rails in the black tubes. The short 1/8 inch launch rods go in the short white tube, all the others go in the long one.
After removal don't leave any low profile objects (steel stakes, launch rods, igniter clips, blast deflectors) sitting off by themselves in the grass as they may be overlooked and left behind when we leave.
Filling the trailer is an art. If you do it wrong, it won't fit. Things have to be loaded in order for it all to get in.
The trailer is parked in the fenced in area by the back gate of the rodeo grounds in Livermore. Back the trailer in and sit it on the trailer stand. Open the trailer and put the trailer hitch just inside the side door. Close and lock the trailer. Put wheel covers on the two wheels. Close and lock the gate.
Good Job![]