Building Your Saturn V
By Tony Cooper, LUNAR #571
As soon as I found out that the immanent release of the Saturn V was not just rumor, I submitted my order with Hobby Link. Http://www.hobbylinc.com. Mine was delivered December 26th. I had made my wife a promise that I would not start building any new rockets until I installed her new floor in the kitchen. Talk about a motivator. She now has her new floor and cabinets. So then I got to start the rocket.
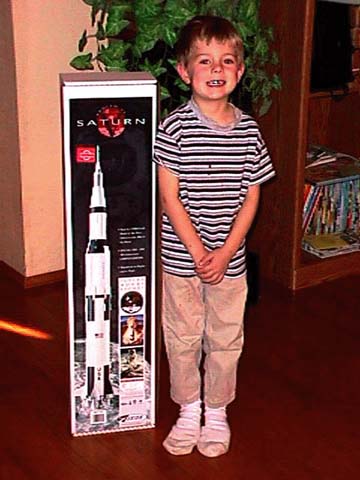
It came in a study NCR style box. Kevon was most impressed that it was nearly as tall as he is. Once I opened the box, I was impressed by the number of parts. I love hard to build kits. The more difficult the better. Soon I discovered that not all the parts will be used. The vacuformed plastic wraps have duplicate hard plastic pieces that do not get used.
Upon taking inventory of the parts, I was unable to correctly identify two of them. The Main Body Coupler verses the Reinforcing Ring. I correctly decided that the Main Body Tube Coupler was the longer (taller) of the two. I never did find a use for the Reinforcing Ring. I ended up using it in the top of the body tube to help stiffen the tube where it couples to the next stage.
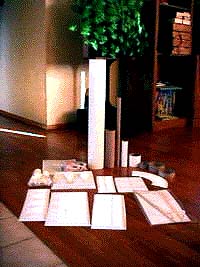
Contents of Saturn V kit. (JPEG 15KB)
24mm to 29mm Conversion
My next issue was that I don't like flying to 175 feet. Long delay element and my rocket hits the ground. I felt that a rocket of this size needs to fly at least 500 feet. I toyed with the idea of just flying it on 24mm RMS. (Reloadable Motor System) rocket motors. That would have met my goal. But after checking my parts inventory and I had a 29mm motor tube on hand, well it just had to be. I got out my Dr. Rockets LDRS XVII commemorative 29mm 240NSec case and made sure it would fit in my new motor mount. Now I'm really looking forward to seeing this go up on a G33 or bigger motor.
My next problem was re-cutting the centering rings for the 29mm tube. Fortunately my wife Sheryl has a craft circle cutter from Fiskar (http://www.fiskars.com/memories/prod_circle_cutter.html).
If you get one be sure to check it's scale. The metric scale on ours is off by a factor of two. So instead of a 31mm (Outside Diameter of my 29mm tube) diameter, I had to set it for 62mm. The hardest part was finding the original centers so I could then cut my new holes.
The next problem was to adjust my CG (Center of Gravity) for the new motor size. I put 1 ounce of BB's inside the command module. I made this guess by building the rocket then put a D motor in the rocket. I found CG and then replaced it with my 29mm 240NSec case and a H220 reload. Then I added weight to bring CG back to the proper location. I'm confident that this rocket will never hold up to an H220 but I may fly it on an H97 one day. Want to watch?
I had no problem with the instructions until I got to step 9. Cutting the Lower 1st stage wrapper. It tells you to cut it 3" long. But its not very specific about where to measure 3" at. In any case it's wrong. I'm going to recommend that you go to step 11 first. Cut out the fairings but not the holes for the fins just yet. Return to step 9. Wrap a piece of 120 or 220 grit sand paper around your body tube. Use that to sand your fairings to the correct shape. Carefully slide them up and down the sand paper on the body tube to get the correct curvature. Once you have them fitting the body tube it's time to pick out the one that is the longest. They should be close but one will inevitably be longer. I would then cut the lower 1st stage wrapper as large as I could. Then tape it onto the body tube and use the long fairing to measure your final cut. Try each fairing in turn to make sure your mark is accurate and you won't leave the wrapper too short. If yours ends up being too short. Well, that is where I used Green Puddy to fix my mistakes.
I now have my rocket assembled and it's first coat of primer on it. In the coming months I plan to put the new counter on my wife's new cabinets and paint this rocket properly. I also need to replace the chutes with nylon due to the added recovery weight of the RMS and the ounce of BB's in the nose. Then wait for July17th launch. See you there.
References:
Essence Model Rocket Reviews
The Apollo Saturn Reference Page
Real Saturn V Picture
Copyright © 1999 by LUNAR, All rights reserved.
Information date: Mar. 16, 1999 lk